Showing posts with label Hacks and Tricks. Show all posts

Tuesday, September 1, 2009

Add Meta Tags To Your Blog

Meta Tags are very important additions to every blog or website. They provide information that helps search engines categorize your website correctly and, therefore, increases traffic to your site. If you use Google AdSense, AdBrite, or any other form of ads, your revenue should most likely be increased due to Meta Elements. Follow the simple steps below to add them to your Blogger/Blogspot blog:

  • Log In to Blogger.
  • Click Layout.
  • Press Edit HTML.
  • Download Full Template (Optional)
  • Press Ctrl+F and search for:

    <b:include data='blog' name='all-head-content'/>

  • Directly above it, type the following:

    <meta content='DESCRIPTION HERE' name='description'/>
    <meta content='KEYWORDS HERE' name='keywords'/>
    <meta content='AUTHOR NAME HERE' name='author'/>

  • Replace the words: DESCRIPTION HERE with a brief description of your blog.
  • Replace the words: KEYWORDS HERE with keywords that describe your blog. Be sure to separate them with commas.
  • Replace the words: AUTHOR NAME HERE with your name.
  • Press Save Template.


Example:

Monday, August 31, 2009

Remove "Subscribe to: Posts (Atom)" Link

  • Log In to Blogger.
  • Click Layout.
  • Click Edit HTML.
  • Download Full Template (Optional).
  • Click the 'Expand Widgets Templates' box.
  • Ctrl+F and search for:
    <b:include data='feedLinks' name='feedLinksBody'/>
  • Delete it.
  • Save Template.

Monday, August 10, 2009

Remove Blogger Navbar


  • Log In to Blogger
  • Click Layout
  • Click Edit HTML
  • Download Full Template (Optional)
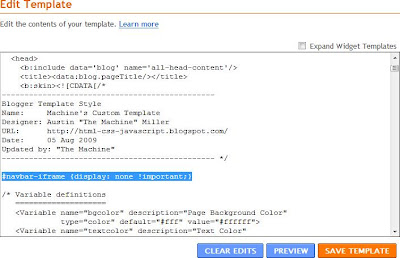
  • Insert #navbar-iframe {display: none !important;} above the Variable Definitions and below the Blogger Template Style information (See Below Photo)
  • Click Save Template

Create a Three Column Blogger Template


  • Log In
  • Layout
  • Edit HTML
  • Ctrl+F and search for: #header-wrapper {
  • Under it, change the width from 660px to 940px.
  • Next, press Ctrl+F and search for: #header .description {
  • Under it, change the max-width from 660px to 940px.
  • After that, press Ctrl+F and search for: #outer-wrapper {
  • Under it, change the width from 660px to 960px.
  • Now, press Ctrl+F and search for: #main-wrapper {
  • Change the below width from 410px to 500px.
  • Next, paste the following red text between the outer wrapper and the main wrapper so that it looks like this:

    #outer-wrapper {
    width: 940px;
    margin:0 auto;
    padding:10px;
    text-align:$startSide;
    font: $bodyfont;
    }


    #left-sidebar-wrapper {
    width: 220px;
    float: $startSide;
    word-wrap: break-word; /* fix for long text breaking sidebar float in IE */
    overflow: hidden; /* fix for long non-text content breaking IE sidebar float */
    }


    #main-wrapper {
    width: 500px;
    float: $startSide;
    word-wrap: break-word; /* fix for long text breaking sidebar float in IE */
    overflow: hidden; /* fix for long non-text content breaking IE sidebar float */
    }


  • After you've done that, Ctrl+F and search for: #footer {
  • Change the below width from 660px to 940px.
  • Now, press Ctrl+F and search for: <div id='main-wrapper'>
  • Directly above it, paste the following code:

    <div id='left-sidebar-wrapper'>
    <b:section class='sidebar' id='left-sidebar' preferred='yes'>
    <b:widget id='BloggerButton1' locked='false' title='' type='BloggerButton'/>
    </b:section>
    </div>


  • NOTE: YOU NOW HAVE A THREE COLUMN TEMPLATE. YOU CAN STOP HERE... OR YOU CAN CONTINUE TO MAKE YOUR COLUMNS NOT CRAMMED TOGETHER. MY ADVICE WOULD BE TO CONTINUE!

  • Finally, in order to to make your columns not crammed together, Ctrl+F and search for : #left-sidebar-wrapper {
  • Under it, change your code to match the following new code (changes are in red):

    #left-sidebar-wrapper {
    width: 185px;
    margin-right: 10px;
    margin-left: 5px;

    float: $startSide;
    word-wrap: break-word; /* fix for long text breaking sidebar float in IE */
    overflow: hidden; /* fix for long non-text content breaking IE sidebar float */
    }

    #main-wrapper {
    width: 500px;
    margin-right: 15px;
    margin-left: 15px;

    float: $startSide;
    word-wrap: break-word; /* fix for long text breaking sidebar float in IE */
    overflow: hidden; /* fix for long non-text content breaking IE sidebar float */
    }

    #sidebar-wrapper {
    width: 185px;
    margin-right: 5px;
    margin-left: 10px;

    float: $endSide;
    word-wrap: break-word; /* fix for long text breaking sidebar float in IE */
    overflow: hidden; /* fix for long non-text content breaking IE sidebar float */
    }

  • Save Template

Sunday, August 9, 2009

Remove Older Posts, Home, and Newer Posts Links in Blogger


  • Log In
  • Layout
  • Edit HTML
  • Ctrl+F and search for:
    #blog-pager-newer-link {
    float: left;
    }

    #blog-pager-older-link {
    float: right;
    }

    #blog-pager {
    text-align: center;
    }

  • Now replace it with this new code:
    #blog-pager-newer-link {
    display: none;
    }

    #blog-pager-older-link {
    display: none;
    }

    #blog-pager {
    display: none;
    }

  • Save Template

Create a Gadget that can only be Viewed on your Blogger Post Pages (Permalink)


  • Log In to Blogger
  • Click Layout
  • Click one of your 'Add a Gadget' buttons
  • Click the HTML/JavaScript option.
  • For the Title, write Gadget-Postpages. For the content, write ABC123. (This is temporary.)
  • Click Save
  • Now, click Edit HTML towards the top of the page.
  • Download Full Template (Optional)
  • Check Expand Widget Templates
  • Ctrl+F and search for Gadget-Postpages
  • Under it you should see a line that says:
    <b:includable id="main">

    Click directly after it, press enter, and paste this code in the empty space:
    <b:if cond='data:blog.pageType == "item"'>

  • Scroll down a little bit, and find:
    <b:include name="quickedit">

    In the blank space above it, paste:
    </b:if>

  • Click Save Template
  • Now press the Layout tab towards the top of the page.
  • You can now change the title and content of the Gadget-Postpages gadget, and it will stay only on your permalink post pages.

Create a Gadget that can only be Viewed on your Blogger Homepage


  • Log In to Blogger
  • Click Layout
  • Click one of your 'Add a Gadget' buttons
  • Click the HTML/JavaScript option.
  • For the Title, write Gadget-Homepage. For the content, write ABC123. (This is temporary.)
  • Click Save
  • Now, click Edit HTML towards the top of the page.
  • Download Full Template (Optional)
  • Check Expand Widget Templates
  • Ctrl+F and search for Gadget-Homepage
  • Under it you should see a line that says:
    <b:includable id="main">

    Click directly after it, press enter, and paste this code in the empty space:
    <b:if cond="data:blog.url == data:blog.homepageUrl">

  • Scroll down a little bit, and find:
    <b:include name="quickedit">

    In the blank space above it, paste:
    </b:if>

  • Click Save Template
  • Now press the Layout tab towards the top of the page.
  • You can now change the title and content of the Gadget-Homepage gadget, and it will stay only on your homepage.

Add a Custom Favicon to your Blogger Website


  • Find a picture that you like on the internet that's fairly simple and represents your site.
  • Log In
  • Layout
  • Edit HTML
  • Download Full Template (Optional)
  • Ctrl+F and search for: </head>
  • Directly above it paste this HTML code:
    <link href='YOUR-FAVICON-URL' rel='shortcut icon'/>
    <link href='YOUR-FAVICON-URL' rel='icon'/>

  • Paste your image's URL where it says YOUR-FAVICON-URL both times.
  • Save Template
  • NOTE: Usually the favicon is best seen when viewed in the Mozilla Firefox web browser.

Include More 'Add a Gadget' Links to your Page Elements Page


  • Log In
  • Layout
  • Edit HTML
  • Download Full Template (Optional)
  • Ctrl+F and search for showaddelement (There are usually a few of these found in your template.)
  • Change them from showaddelement='no' to showaddelement='yes'
  • If you see maxwidgets='1' in front of showaddelement, backspace the 1 to change it to maxwidgets=''.
  • Save Template

Take Credit for a Blogger Template


  • Log In
  • Layout
  • Edit HTML
  • Download Full Template (Optional)
  • Where it says Blogger Template Style, under it, change the information to your own.
  • Save Template

Remove Blogger Title Border


  • Log In
  • Layout
  • Edit HTML
  • Download Full Template (Optional)
  • Ctrl+F and search for Border Color
  • Directly under that, replace the current value with transparent
  • Save Template

Change Order of Blogger Posts


  • Log In
  • Posting
  • Edit Posts
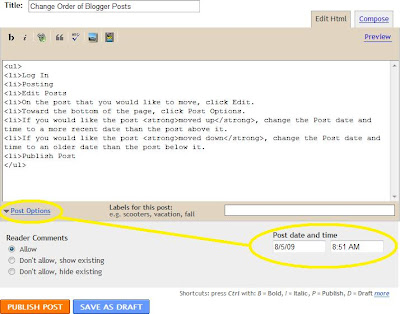
  • On the post that you would like to move, click Edit.
  • Toward the bottom of the page, click Post Options.
  • If you would like the post moved up, change the Post date and time to a more recent date than the post above it.
  • If you would like the post moved down, change the Post date and time to an older date than the post below it.
  • Publish Post

Create Wide Blogger Columns


  • Log In
  • Layout
  • Edit HTML
  • Download Full Template (Optional)
  • Ctrl+F and search for #outer-wrapper {
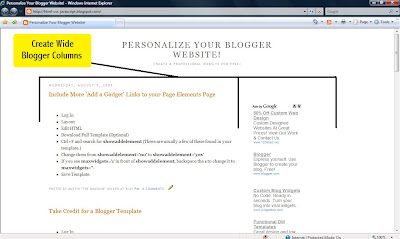
  • Directly under that, change the width from 660 px to 970 px (You have just now moved the columns apart.)
  • Next, Ctrl+F and search for #main-wrapper {
  • Change the width from 410 px to 650 px (You made the Main Posts column wider.)
  • Finally, Ctrl+F and search for #sidebar-wrapper {
  • Change the width from 220 px to 300 px (You made the Sidebar column wider.)
  • Save template

Unlock Blogger Page Elements


  • Log In
  • Layout
  • Edit HTML
  • Download Full Template (Optional)
  • Check Expand Widget Templates
  • Ctrl+F and search for locked='true'
  • Change true to false
  • Repeat for Remaining Elements
  • Save Template